Sunday, April 17, 2011

A Play Kitchen For My Darlings...

I have a theory in life... If you can't find it or afford it, you should make it.  

..........
This theory definitely came in handy lately when we decided one of my angels "needed" a play kitchen.  She is constantly serving everyone cakes and tea and other creations she has made.  So sweet it almost makes a sappy mama like me cry!

So, we began searching and scouring stores and the internet, but could never find what we wanted.  I am a self-proclaimed snot about some things, and particle board is one of the things that I refuse to spend my money on.  So we narrowed our search to this one... It is at Pottery Barn and cost an unsightly $879.  


I could barely pick my chin up off the floor!  They say you can't put a price on love, but I would dare say that most parents are like me and would draw the line around spending $900 on a toy their princess will outgrow in a few years. I decided I am just too cheap for this toy...

Instead, I found plans for a homemade version on the Lowe's website that would work out just as well.  The plans said *advanced* level... Cue the sound of me calling in my dad for reinforcement!  We ended up with this:


We built the ENTIRE thing out of scrap wood that was just laying around.  Then added some real details that stepped up the style for my babies!


 The knobs are authentic and came from a second-hand appliance store, and the burners are a combination of mortar saw blades (not sharp, I promise!) and furniture slides.


 The sink (a boat sink from a local surplus store) and the faucet (donated by the greatest papa in the world) are perfectly sized for tons of imagination and play!


The refrigerator shelves were cut from a wire shelf bought at a local home improvement store.

DRUM ROLL FOR THE GRAND TOTAL, PLEASE...
$87.49...
 
 ..........

And lest you think that their kitchen always looks this perfect... Here is a picture of it just 15 minutes after I staged it for pictures! 


Love those girls of mine...


Wednesday, March 30, 2011

Just passing a little time...

This week has been cuh-razy...

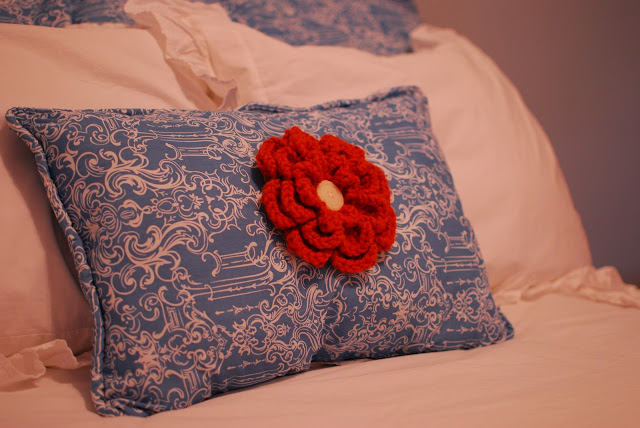
We have taken on a new project (and it is a BIGGGGG one!) but more on that later. So, there has been little time for projects, but I did manage to squeeze in one little fun one using this fabulously orange wool yarn that I couldn't resist last time I was at the store.  Isn't it just oh so yummy and cheery?!?


So, I went and pulled out my crochet needles that have only been rarely used since college.  And, yes, I know what you are thinking... and the answer is yes - I was *cool* enough to crochet when I was in college.


And I got to work on a new pattern that I had never used - a big, bulky, fluffy, wonderful flower.  It took a few tries, but I finally got it.


I do have to admit that I could not figure out how to close the center of the flower, but that was nothing a little vintage button could not fix.  Projects like this have a way of keeping you on your toes!

By the way, what do you think of my favorite new little find?  That box was $5 - yes $5! at a flea market lately with my wonderful sister.


After finishing the flower, I sewed up this little pillow that I made out of material that coordinates with my little girls bedding to give it a quirky little pop of color.


So much fun... Where else can I possibly attach one of these suckers because I am totally addicted to making them!

Friday, March 18, 2011

Beautiful waste of time...

This time of year is undoubtedly my very favorite.  I love the changes that plants, the weather, and the environment goes through.  I even love Spring Cleaning, but I am a bit of a sicko...

You can literally watch things come back to life after months of dormancy which is one of the most beautiful things one can witness.  So, the other 10 or 11 months of the year I paint and reno, but for this couple of months, I don my camera and do my best to capture the scenery that I so dearly love.

It is a waste of time, but I love it...


These are beautiful trees captured near my sister's house.  Aren't they grand? 


You have to look close, but you can see those miraculous signs of life.


And this tree should truly be the inspiration for a room. 


A little girl's room would be so beautiful in this combo of turquoise and pink. 

Are you inspired yet?


Saturday, March 5, 2011

Life, liberty, and the pursuit of great photo books...

I used to be a scrapbooker.  I would pull out all the boxes of paper, special scissors, specific adhesive, stickers, and die cuts.  I would set it up meticulously so that I could be as creative as possible. Inevitably, as soon as I would do this, my kids would wake up from their naps and I would have to put it all up again with little progress made.

This predicament led me to try out digital scrapbooking, and I have to tell you I have now seen the light.  I am a full-fledged Photoshop using, PNG creating, clipping mask addicted digi convert.  But, with digital scrapbooking comes the dilema of where to print...

There are TONS of options available for this, and I have tried several.


And, here is what I think of the ones I have tried:


*SNAPFISH*


Snapfish was the first option I tried.  I loved the price, and the peek-a-boo window that was offered with this book.


The matte finish of the cover was great, and was not prone to finger prints or smudges.  However, the rectangle shape did not fit on a shelf very well for storage.


The binding is sewn, and does not lay flat.


and the pages were fairly thin... And, so, the search continued.

*INKUBOOK*

From Inkubook, I started out ordering the square photobooks.  The outside of the book is available in matte and shiny.  I had a slight preference for the shiny book, but it smudges and fingerprints really bad.  My girls love to look at their books, so the prints were a real problem for me.


The binding here was glued and leaves this white strip on the inside and back cover.


The binding does not lay flat, so if you use Inkubook be careful about the huge gutter that might some of your hard workin' digi-scrapbooking time!


However, the paper was thicker, and being a bit of a paper snob, that made me ridiculously happy!


Also, unlike Snapfish, Inkubook always stamps their back cover with their logo, which might deter some people from ordering with them.


Obviously, the quality was better than Snapfish, because I stuck with them for quite a while...


But, there was still some issues, so the search continued...

*ADORAMAPIX*

I finally found my digi-scrapbooking soul mate the day I received my first Adoramapix photo book - it was a little more expensive, but beautiful enough to make up for it!


 It had a beautiful and thick cover with printing that is similar to metallic photo prints. 


Here is the comparison of thickness - these two books are the same number of pages... Inkubook on bottom, Adoramapix book on top.  It is a serious heavy weight!


The binding is glued, which allows "true flat" pages with no gutters (woohoo!!!!!) which equals no loss of your designs...


The pages are thick, almost as thick as a toddler board book.  I let my kids look through this book and never had to worry about them tearing...

If anyone is thinking of ordering from Adoramapix though, I would like to offer one tidbit of advice.  If allowed, Adoramapix will begin printing on the first page.  This is a concern because of the creases left by gluing the binding.


So, my suggestion would be to implement plain black pages for the first and last page, or even possibly a dedication page, such as this...


I think I finally found the one to stick with... Anyone else have a preference?!?!?

Saturday, February 26, 2011

If you're crafty and you know it...

So this weekend, my entire house has been sick - ugh!  So, I took a break from refinishing furniture, but I could not resist a little bit of organizing...  what a weirdo, huh?!?

So, I tackled a cabinet that we purchased a long time ago.  It has made the rounds in our house, and has temporarily been in every room except the bathrooms.  Today, it made its way to the master bedroom.


See, I am a crafty girl, but what used to be my craft closet has been taken over by Barbies and Zhu Zhu Pets.  So, I had moved all my craft supplies out to a cabinet in the garage.  But, my creativity felt stifled by the absence of paint stained brushes and sewing projects...  So, I decided to turn this confused computer armoire into a craft station...


It now has a handy little area for my sewing machine, thread and other supplies (thanks to my *awesome* hubby who moved the thread holders from a Craigslist sewing cabinet to this one.  We plan to make that sewing cabinet into a computer station for the kids, but more on that later...)


And, it is emberassingly strange how excited I am to have all my paints finally in the same place!  They now reside snugly in one of the drawers...


Also, the shelves on top give lots of storage space for antique pricing guides, how to books, and baskets full of crafting supplies.  My brushes are the most important things to have near-instant access to.


And what would a new arrangement be without a little something quirky... This pig is an ADORED gift from my oldest sister and the perfect place for needles, rulers, and pins that otherwise would be *everywhere*!


Now, if I only had the energy left to go craft something... Oh well, there is always tomorrow...

Monday, February 14, 2011

Seeing the Diamond in the Rough...

So Craigslist can be a scary, scary place that can be overwhelming to navigate.  At times, Craigslist is a treasure trove of amazing deals on vintage, one-of-a-kind items.  Other times, it is a whole bunch of garage sale rejects that get my germ radar to humming just by looking at their pictures.

However, a few weeks ago, I saw this listing for a vanity & bed frame, and it caught my interest.  However, the seller wanted too much, and the weather was funky, so I ignored the listing.  However, a week later the listing was still in the back of my mind and available.


 However, when we got there it had this *hideous* brown finish that frightened me.  What I thought was creamy white furniture that just needed a tune up (wipedown and handle change) now needed a major overhaul.  It looked more like this:


I think I physically gagged when I got out of the truck.  However, there was potential.  The furniture was old... It was even built with biscuit joints and wood peg construction and was sporting some FABULOUS antique casters on the bed frame, so I bit the bullet and brought it home.

I got to work with my Oh-So handy sander... I have spent so much time with this one tool that I might have to will it to someone when I die :)  Let me know if you're interested...


As soon as some of the finish left, the potential was so overwhelming...


Here is the finished product.  Drumroll please...


We were going for this lovely creamy but still a little rustic finish.


The vintage glass knobs were a Ebay find.  Love them!


So now I am off to redo an entire room to find room for my newest find... That is, if I can stay away from Craigslist long enough... *sigh*